


If you’re looking for a sustainable, eco-friendly way to store food, making your own beeswax wraps is a fun and practical solution. Beeswax wraps are a reusable alternative to plastic wrap, perfect for keeping fruits, vegetables, sandwiches, and leftovers fresh. In this guide, we’ll show you exactly how to make your own beeswax wraps, step by step, so you can enjoy the benefits of homemade bees wrap in your kitchen.
Table of Contents
ToggleWhat Are Beeswax Wraps?
Beeswax wraps are pieces of fabric coated with a layer of beeswax, sometimes combined with natural oils or pine resin, to make them flexible and slightly sticky. They mold easily around bowls, fruits, vegetables, and sandwiches, providing a sustainable solution to single-use plastics.
Using beeswax wraps for food not only reduces waste but also helps keep your food fresh longer. They are breathable, naturally antibacterial, and can be reused for months with proper care. Unlike beeswax paper, which is often coated with paraffin, DIY beeswax wraps are fully natural and non-toxic.
Ingredients and Materials Needed for DIY Beeswax Wraps
Before you start your diy beeswax wrap project, gather these ingredients and tools:
- Cotton fabric for beeswax wraps (organic cotton works best)
- Beeswax pellets or shaved beeswax
- Optional: jojoba oil for flexibility and pine resin for stickiness (for pine resin beeswax wraps)
- Tools: baking tray, parchment paper, brush, iron or oven
Having the right materials is essential if you want reusable beeswax wraps that last. Using good-quality cotton and pure bees wax wraps ensures your homemade beeswax wraps are durable and functional.
Step-by-Step Guide – How to Make Beeswax Wraps at Home
Creating your own diy beeswax wraps is easier than you might think. Follow these steps to make your own bees wrap with confidence:

Preparing the Fabric
Start by washing and drying your fabric to remove any dirt or chemicals. Cut the fabric into the size you need—common sizes include small squares for sandwiches and larger rectangles for covering bowls. Properly preparing the fabric ensures the beeswax wrap diy will adhere evenly and last longer.
Melting the Beeswax
Next, melt your beeswax using a double boiler or in the oven at a low temperature. If you want a more flexible diy beeswax food wrap, you can add a small amount of jojoba oil or pine resin beeswax wraps for extra tackiness. Make sure not to overheat the wax, as it can burn and ruin your wraps.
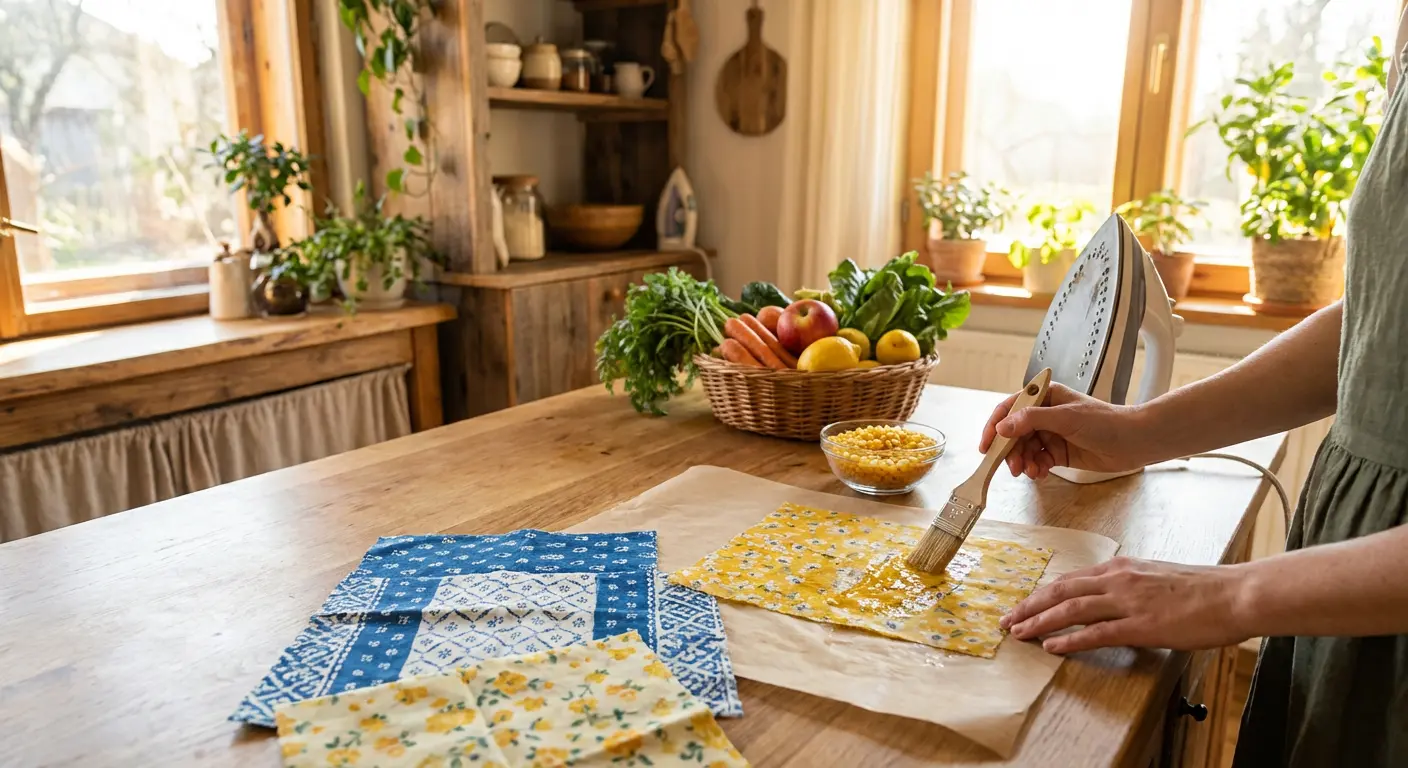
Applying Beeswax to Fabric
Sprinkle or brush the melted beeswax evenly over the fabric. Using too much wax can make the wraps stiff, while too little may reduce their effectiveness. For beeswax wrap recipes, aim for a thin, even layer across the entire piece of fabric.
Setting the Wrap
Place a sheet of parchment paper over the coated fabric and use an iron or oven to melt the wax into the fibers. Allow the wrap to cool and harden naturally. Once cooled, your homemade bees wrap is ready to use.
Tips for Perfect DIY Beeswax Wraps
- Avoid over-waxing or under-waxing for best results.
- Choose breathable, natural fabrics such as cotton or linen for long-lasting reusable beeswax wraps.
- If cracks appear, gently reapply wax and melt again for a smooth finish.
Following these tips ensures your beeswax wrap diy is functional, attractive, and ready for everyday use.
How to Use and Care for Your Beeswax Wraps
Using beeswax food wraps is simple. Wrap sandwiches, cover bowls, or protect fruits and vegetables. To clean, gently wash your wraps in cool water with mild soap and air-dry. Avoid hot water or microwaves, as excessive heat can melt the wax. With proper care, reusable beeswax wraps can last up to a year and be re-waxed to extend their life.
Beeswax Wrap Recipes – Variations and Ideas
There are many ways to personalize your beeswax wraps recipe. You can make vegan beeswax wraps using candelilla or soy wax instead of beeswax, or create beeswax sandwich wrap diy with fun patterns for kids. Adding a few drops of essential oil can make scented wraps, while experimenting with beeswax wrap recipes using pine resin beeswax wraps can increase stickiness for covering bowls and jars.
Why Make Your Own Beeswax Wraps?
Making your own beeswax wraps offers several advantages over store-bought versions:
- Cost-effective and reusable, reducing waste
- Full control over ingredients and fabrics for safe, natural wraps
- Fun DIY project that adds a personal touch to your kitchen
- Perfect for gifts or eco-friendly households
By choosing to make beeswax wraps at home, you invest in sustainability and convenience while learning a valuable DIY skill.
Why Trust Best Eco Kitchen Tools
At Best Eco Kitchen Tools, we provide trusted advice on eco-friendly kitchen products and practical DIY solutions. Our homemade beeswax wraps guides are tested, reliable, and designed to help you create reusable beeswax wraps safely and effectively. With years of expertise in eco-conscious cooking and sustainable living, we prioritize quality, sustainability, and real-world results for every project.
When you follow our tutorials, you can be confident that you are making durable, safe, and environmentally responsible beeswax wraps for food that work in your everyday kitchen.
Check Related Posts: Are Bamboo Straws Biodegradable | Silicone vs Wood Cooking Utensils | Which Are the Best Metal Utensils for Cooking | What Is the Best Cooking Utensil Material | Nylon vs Silicone Cooking Utensils | What Is the Best Wood for Cutting Boards | Best Rated Titanium Cutting Boards |
Frequently Asked Questions
How long do homemade beeswax wraps last?
Homemade beeswax wraps typically last 6–12 months with proper care and can be refreshed by re-waxing to extend their life.
Should I wash my fabric before making beeswax wraps?
Yes, washing and drying your cotton fabric for beeswax wraps ensures the beeswax adheres properly and removes any residues.
Is jojoba oil or coconut oil better for beeswax wraps?
Both oils work well, but jojoba oil is preferred for diy beeswax wraps because it keeps wraps flexible longer.
What are the disadvantages of beeswax wraps?
Beeswax wraps are not heat-resistant and may melt with hot foods; they also require gentle cleaning and occasional re-waxing.