


Most people buy a stainless steel pan but don’t know how to cook with stainless steel pans, try it once, and give up after their food sticks to it. I know that feeling — I did the same thing.
But here’s the truth: stainless steel pans are not difficult. You just need to know a few simple tricks. Once you learn them, you’ll never want to go back to non-stick.
The short answer? Always preheat your pan, add oil at the right time, and let the food release on its own. That’s the secret.
In this guide, I’ll walk you through everything — why stainless steel is worth it, how it works, a step-by-step cooking method, the best oils to use, and the biggest mistakes to avoid. By the end, you’ll feel confident every time you cook with it.
Table of Contents
ToggleWhy Cook with Stainless Steel?
Durability & Longevity A good stainless steel pan can last a lifetime. Non-stick pans scratch easily and the coating wears off after a year or two. With stainless steel, you don’t have to worry about that. I’ve had mine for over five years and it still looks great.
Non-Toxic & Chemical-Free Cooking Surface Non-stick pans have a synthetic coating — usually PTFE (Teflon). When it gets too hot, it can release harmful fumes. Stainless steel has none of that. You’re cooking on a clean, chemical-free surface every single time.
Better Browning & Flavor (The Maillard Reaction) Stainless steel gets really hot and stays hot. That intense heat creates a beautiful brown crust on your meat or vegetables. This is called the Maillard reaction — it’s the science behind that deep, rich flavor you get from a perfectly seared steak. Non-stick pans simply can’t do that as well.
The Professional Chef’s Choice Walk into any professional kitchen and you’ll see stainless steel pans everywhere. Chefs use them because they handle high heat, go from stovetop to oven, and give precise control over cooking. When you learn how to use them properly, you cook like a pro.
Understanding Your Pan Before You Cook
How Stainless Steel Is Different from Non-Stick Non-stick pans have a slick coating that stops food from sticking right away. Stainless steel has no such coating. Instead, it works on heat and the natural proteins in your food. When the pan is hot enough, the food forms a crust, seals up, and naturally releases from the surface. That’s the key difference.
Why Food Sticks — and How to Prevent It Food sticks to stainless steel when the pan is not hot enough. When you place cold food on a cold or warm pan, the proteins in the food bond with the metal and grab onto it. But when the pan is properly preheated, a thin vapor layer forms between the food and the pan — and that layer prevents sticking.
So the solution is simple: always preheat your pan before adding anything.
The Science of Heat Distribution Stainless steel by itself is not a great conductor of heat. That’s why most quality pans have an aluminum or copper core — called tri-ply or multi-ply. This core spreads heat evenly across the entire pan so every part of your food cooks at the same rate. No hot spots, no burning in the middle.
✅ Quick Tip: Always preheat your pan before adding oil. This is the single most important rule for cooking with stainless steel. Give it 2–3 minutes over medium heat before you do anything else.
Step-by-Step: How to Cook with Stainless Steel Pans
Follow these 7 steps every time and your food will never stick again.
Step 1: Preheat the Pan Properly Place your empty pan on the stove over medium heat. Let it sit for 2 to 3 minutes. Don’t rush this step. A properly preheated pan is the foundation of everything that follows.
Step 2: The Water Droplet Test (Leidenfrost Effect) Flick a few drops of water into the pan. If the water sizzles and evaporates right away, the pan is still too cold. If the water forms small, round balls that glide across the surface — that’s the Leidenfrost Effect. Your pan is at the perfect temperature. This is your green light to add oil.
Step 3: Add Oil at the Right Time Once the water droplets glide, add your oil. Pour just enough to coat the bottom of the pan and swirl it so it covers the surface evenly. Never add oil to a cold pan — it will break down and burn by the time the pan heats up.
Step 4: Wait for the Oil to Shimmer Watch the oil closely. In about 30 to 60 seconds, you’ll see it start to shimmer — a light, rippling wave across the surface. That shimmer tells you the oil is hot enough. Now you’re ready to add your food.
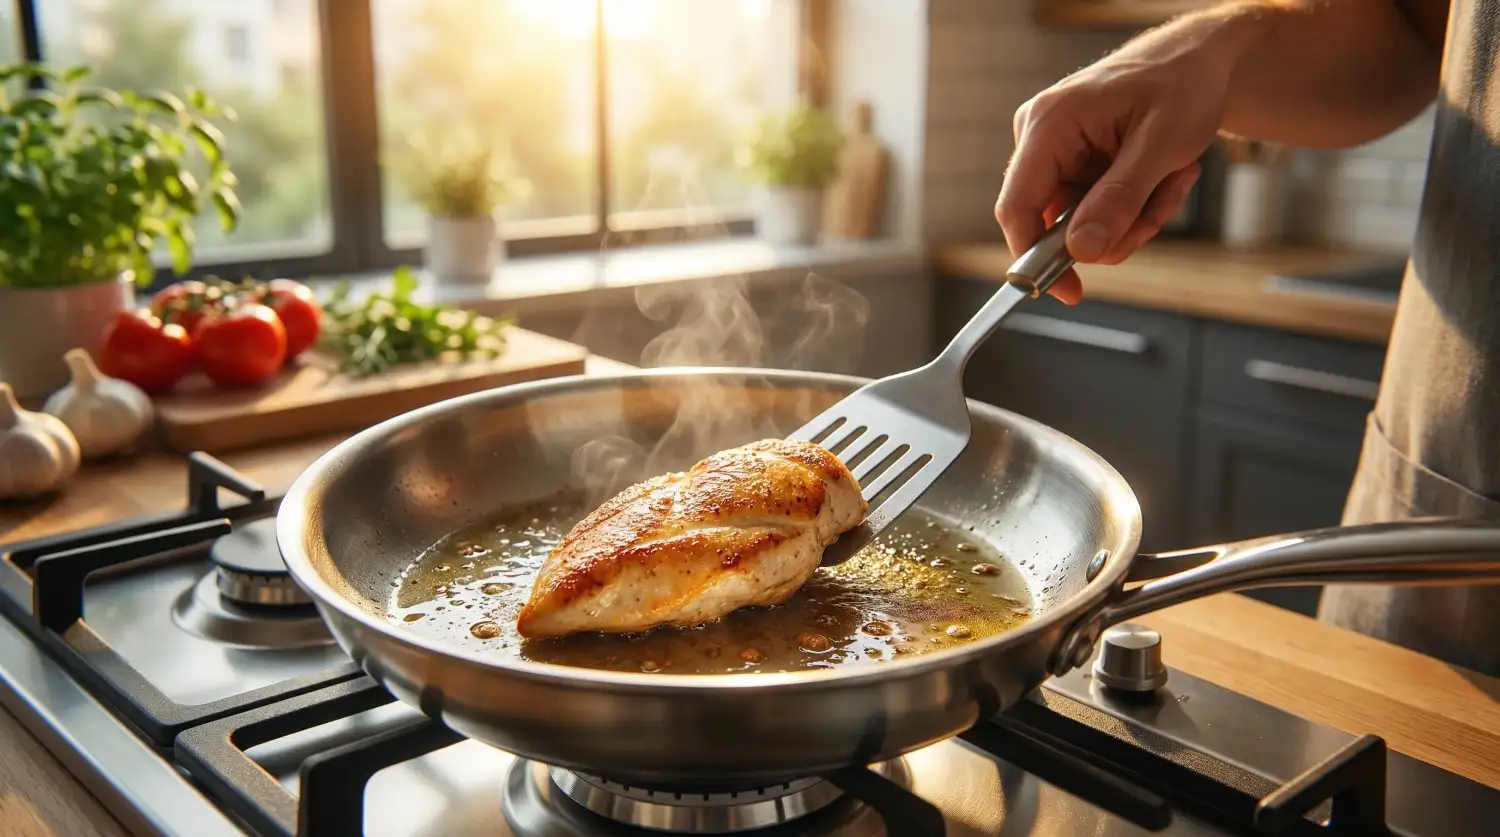
Step 5: Add Your Food — and Don’t Move It Gently place your food in the pan away from you to avoid splatter. Once it’s in, leave it alone. Don’t poke it, press it, or move it around. This is the step most beginners get wrong. Let the heat do its job.
Step 6: Know When to Flip (Food Releases Naturally) Here’s the magic of stainless steel: when your food is ready to flip, it will release on its own. Try to lift it gently after 2 to 3 minutes. If it resists, wait another 30 seconds and try again. When it’s ready, it will come off cleanly. Trust the process.
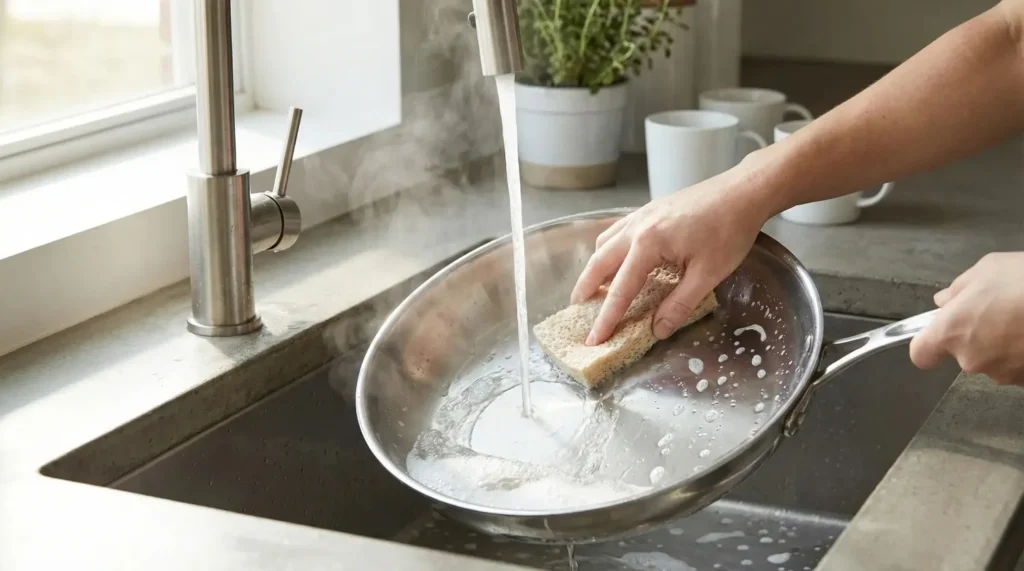
Step 7: Deglazing & Cleanup After cooking, you’ll see brown bits stuck to the pan. These are called fond — and they’re packed with flavor. Add a splash of broth, wine, or water to the hot pan and scrape up the bits with a wooden spoon. That’s deglazing, and it creates an instant, rich sauce. For cleanup, let the pan cool slightly, then wash with hot water and dish soap. Soak for 10 minutes for stubborn residue.
Best Oils to Use with Stainless Steel
High Smoke Point Oils — Your Best Friends For stainless steel cooking, you need an oil that can handle high heat without burning. The best choices are avocado oil, grapeseed oil, and canola oil. They all have high smoke points and a neutral flavor, so they won’t overpower your food.
Avocado oil is my personal favorite. It has the highest smoke point of all — around 520°F. It works perfectly for searing steaks or any high-heat cooking. Grapeseed oil is light, neutral, and great for medium to high heat. Canola oil is the most affordable and widely available choice for everyday cooking.
Oils to Avoid — and Why Flaxseed oil and extra-virgin olive oil have low smoke points. They burn quickly at high heat, leaving a bitter taste and dark residue in your pan. Save olive oil for finishing — drizzle it on after cooking for flavor, not for searing. Butter burns fast too. Use it only for low to medium heat, or mix it with a high smoke point oil to raise its tolerance.
Quick Reference: Oil Comparison Table
Oil | Smoke Point | Best For |
Avocado Oil | 520°F (271°C) | High-heat searing, frying |
Grapeseed Oil | 420°F (216°C) | Sautéing, everyday cooking |
Canola Oil | 400°F (204°C) | General cooking, frying |
Olive Oil | 375°F (190°C) | Medium-heat cooking |
Coconut Oil | 350°F (177°C) | Low to medium heat |
Butter | 300°F (149°C) | Low-heat cooking only |
Flaxseed Oil | 225°F (107°C) | Avoid — burns quickly |
What to Cook in Stainless Steel
Searing Meats — Steak, Chicken, Fish Stainless steel is the best pan you can use for searing meat. The high heat creates a deep, golden-brown crust that locks in all the juices and flavor. For steak, pat it dry before it goes in the pan — moisture is the enemy of a good sear. For chicken, press it flat with a spatula for the first 30 seconds to get even contact. For fish, make sure the skin side goes down first and don’t touch it until it releases on its own.
Sautéed Vegetables Stainless steel gives vegetables a beautiful caramelized edge that a non-stick pan can’t match. Cut your vegetables into similar sizes so they cook evenly. Don’t overcrowd the pan — if you add too many at once, they steam instead of sauté. Cook in batches if you need to. A little oil, medium-high heat, and a few minutes is all it takes.
Sauces & Pan Gravies This is where stainless steel truly shines. After you cook your meat, those brown bits left in the pan — called fond — are pure flavor. Add wine, broth, or even water and scrape them up. That liquid turns into a rich, glossy sauce in minutes. No other pan gives you that depth of flavor as easily as stainless steel does.
Eggs — With the Right Technique Yes, you can cook eggs in a stainless steel pan. But you have to be patient with the technique. Use low to medium-low heat, add butter or oil, and wait until the fat is fully heated before adding the eggs. Let them sit without touching. Once the edges turn white and start to lift, they’re ready to flip. It takes a little more care than non-stick, but once you get it right, the result is perfect every time.
Common Mistakes to Avoid
Adding Food to a Cold Pan This is the number one mistake. If you put food into a pan that hasn’t been preheated, it sticks immediately. The proteins in the food bond with the cold metal surface. Always do the water droplet test first. If the water doesn’t bead up and glide, your pan is not ready.
Using Too Little or Too Much Oil Too little oil and your food will dry out and stick. Too much oil and your food ends up greasy and won’t sear properly. You need just enough to coat the bottom of the pan in a thin, even layer. Swirl it around and make sure there are no dry spots before you add your food.
Cooking on Too High Heat High heat doesn’t mean better results with stainless steel. It just means burnt food and a pan that’s harder to clean. Medium to medium-high heat is the sweet spot for most cooking. Save high heat only for a hard sear on thick cuts of meat — and even then, watch it closely.
Moving Food Before It Releases on Its Own I said it before and I’ll say it again — stop moving your food. When you keep poking, pressing, or sliding food around the pan, you break the sear and the food tears. Patience is everything here. Wait for it to release naturally. When it does, you’ll get a clean flip every single time.
Using Metal Utensils Improperly Stainless steel can handle metal utensils — that’s one of its advantages over non-stick. But don’t scrape aggressively or jab at stuck food while the pan is still hot. Use a flat-edged metal spatula for flipping. For stirring sauces, a wooden spoon or silicone spatula works best and protects the pan’s surface over the long term.
How to Clean & Maintain Your Pan
Daily Cleaning Routine After every use, let your pan cool down slightly — never plunge a hot pan straight into cold water. Thermal shock can warp the pan over time. Once it’s cooled, wash it with warm water, a few drops of dish soap, and a soft sponge. Rinse well and dry it immediately with a towel. Leaving water to air dry causes water spots and dulls the finish.
Removing Burnt Food — The Baking Soda Method If food is stuck and won’t come off with regular washing, don’t panic. Add a thin layer of water to the pan and bring it to a gentle boil on the stove. Add one tablespoon of baking soda and let it bubble for 2 to 3 minutes. Turn off the heat, let it cool, and then scrub gently with a non-scratch sponge. The burnt bits will lift right off. This method works every time and won’t damage your pan.
Restoring a Discolored Pan If you see blue, brown, or rainbow-colored stains on your pan, don’t worry — that’s just heat tint. It happens when the pan gets very hot. To fix it, pour a small amount of white vinegar into the pan and rub it around with a cloth or soft sponge. The discoloration disappears within seconds. Rinse and dry. Your pan will look brand new again.
What NOT to Do Never put your stainless steel pan in the dishwasher. The harsh detergent and high heat cycles will dull the finish and can damage the pan over time. Never use steel wool or harsh abrasive pads — they scratch the surface and leave marks. And never use bleach-based cleaners. Stick to gentle soap, baking soda, and white vinegar. Those three are all you’ll ever need.
Conclusion
Cooking with stainless steel is not complicated — it just takes a little knowledge and practice. Preheat your pan every time, add oil at the right moment, choose the right heat level, and let your food release naturally. Follow those four rules and you’ll get great results every single time.
I know it feels tricky at first. But give it three or four tries and it will start to click. The food you cook in a stainless steel pan — the sears, the sauces, the flavor — is on a completely different level from anything a non-stick pan can produce. It’s worth learning.
Start with something simple today. Try searing a chicken breast or sautéing vegetables using the step-by-step method in this guide. You’ll be surprised at how easy it actually is once you know what you’re doing.
Check Related Post: Triply vs Stainless Steel Cookware | Beeswax Wrapping Paper | How to Store Beeswax Wraps | How Long Do Beeswax Wraps Last | 6 Best Cast Iron Cookware Set | Are Air Fryers Healthy | How to Choose the Right Induction Cookware Pots
FAQ — Your Top Questions Answered
Why does food stick to my stainless steel pan?
Food sticks because the pan wasn’t preheated properly. When the pan isn’t hot enough, the proteins in your food bond directly with the metal surface. Always preheat your pan for 2 to 3 minutes on medium heat and do the water droplet test before adding oil. Once the water beads up and glides across the surface, your pan is ready. That one step alone solves 90% of sticking problems.
Do you need to season a stainless steel pan?
No, you don’t need to season a stainless steel pan the way you would a cast iron. Stainless steel doesn’t have the same porous surface that needs to be built up with oil. The key to a non-stick surface on stainless steel is proper preheating and adding oil at the right temperature — not seasoning. Some people do a light oil seasoning to reduce sticking over time, but it’s completely optional.
Is stainless steel better than non-stick?
It depends on what you’re cooking. Stainless steel is better for high-heat cooking, searing meats, making pan sauces, and long-term durability. Non-stick is easier for delicate foods like eggs and pancakes, especially for beginners. But stainless steel gives you more control, more flavor, and lasts far longer. Once you learn the technique, most home cooks prefer stainless steel for everyday cooking.
Can you cook eggs in a stainless steel pan?
Yes, you absolutely can. The key is low heat, enough fat, and patience. Use butter or a neutral oil over low to medium-low heat. Let the fat heat up fully before adding the eggs. Then don’t touch them. Let the edges set, and once the eggs lift easily from the surface, they’re ready to flip. It’s a little more technique than non-stick, but the result is just as good — and with practice, it becomes second nature.
What heat setting should I use?
Medium heat is the right setting for most cooking in stainless steel. It gives the pan enough time to heat evenly without burning the oil or your food. Use medium-high heat for searing meats or getting a deep caramelized crust on vegetables. Use low to medium-low for delicate foods like eggs, fish, or sauces. The biggest mistake people make is turning the heat too high too fast. Start at medium, give the pan time to heat up, and adjust from there.